Rendering : All convex solids with regular faces
Created on February 11, 2019.
Introduction
If you have taken a look at the graph of convex polyhedra with regular faces in this post, you could see that by hovering over a node, animations of the corresponding solid would be displayed. I could not use the glass rendering I had made for the origami models because it would have been too long to render for the 200+ solids in the graph. So I needed another approach. In this article I show how I made these simpler renders.
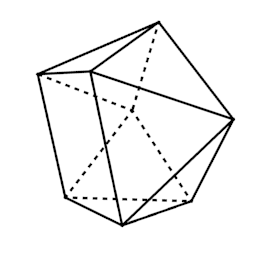
My motivation was also triggered by a paper (in both French and English, hurray!) about convex polyhedra with regular faces [2] with nice wireframe sketches for all non composite solids (M1 to M28 according to Zalgaller notations) and prisms/antiprisms. This paper is mostly a photographic portfolio of cardboard (the cardboard part is my guess though, it could be wood) hand made models for regular, semi-regular and Johnson solids which I find amazingly well done though the pictures are in black and white. It also contains a table of some of the properties of the solids which I could (and did) display in my graph. So, I wanted to reproduce the wireframe pictures to include in the graph but, obviously, I wanted to have animations that I could be proud of and that would make the understanding of the 3D shape easier.
Models At this point, I had obviously finished making the meshes for all convex solids: the reduced set of prims and antiprims (6 for each) needed to buid composite solids, the 5 regular (Platonic) solids, the 13 semi-regular (Archimedean) solids, the 92 Johnson solids and the 78 solids with conditional edges only. The total number is 200 even though the cube and octahedron are counted twice as the 4-prism (P4) and 3-antiprism (A3), respectively. Additionally, there are chiral versions for some of the solids : 2 for the semi-regular ones, 5 for the Johson solids and 9 for the conditional edges family. In the end, the total number is 216, 214 without the redundant P4 and A3.
Blender Setup In order to speed up the rendering process, I decided not to use Cycles but the blender render engine. Remember that I don’t have an appropriate graphics card so all the computing is done on my 10-year-old CPU.
I wanted to show the solids at the largest possible scale without being cut by the camera square frame so I set a sphere at the solid position to get the correct scale factor and then I renormalized the solids extent so that they would fit inside this sphere.
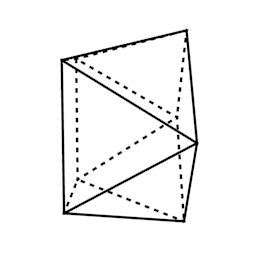
Wireframe Rendering : Black and White style
As I said in the introduction, the goal was to get a wireframe rendering with black edges on a white background. The edges must appear in a solid line when not occulted by the geometry and with dashed lines otherwise. I learned that Blender has a specific tool to render lines called Freestyle. It is made to render many types of lines such as edges, silhouettes, etc. I think I spent one hour just to find the checkbox to activate it at the bottom of the render tab. Overall, there are lots of options and I spent some time investigating all of them.
I set the background color of the scene to white and marked shadeless in the material properties to make it invisible. Moreover, the sampling number of the line dashes need to be changed in some internal blender file [1], otherwise there may be some popping artifact of the dash spacings during the animation. Here is the blender file TODO: . Obviously, as for the glass render, I used a script to load and unload the meshes in a loop.
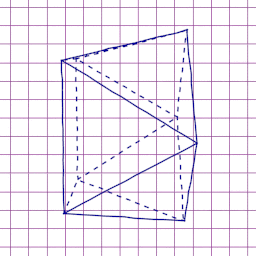
Wireframe Rendering : Pen-on-paper Style
When looking at the wireframe illustrations from the paper in detail, I could see that they were handmade. It makes sense since the paper is from 1982 and computer graphics and renders were not as easy to do as they are now. However, I liked this hand made feeling, with the lines not always straight, of varying thickness and, sometimes, even disappearing. Freestyle allows to customize the line style in many different ways. I used a modifier on the line geometry to add some random displacement following 2D Perlin noise. Unfortunately, the displacement is relative to a global direction over the image and not relative to the edge direction, so when the line lies in the same direction as the global one there is no displacement at all.
As a nostalgic touch, I set the background to the picture of a squared sheet of paper, the one from the notebooks typically used in middle and high school. I set the line color to a dark blue to mimic the standard blue ballpoint pen, though, I am quite sure I did not get the color exactly right.

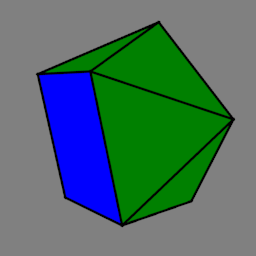
Shadeless Color Rendering
I also wanted to replicate the render from the Visual Polyhedra website [3] with black thin edges, one color per face depending on the face type (triangular, square, pentagonal, …) with flat shading. I dropped the shading part, though, because I wanted small output files for lightweight animation and I knew that gif format as a really small color space which prevents any smooth gradient. Dithering could be an option for the gif color space issue but the shadeless render also gives a minimalist look to the render in my opinion. Since I’ll provide the files I used for the render, you can make your own according to your tastes anyway.
Here I am back with my promise from an earlier post on face colors for meshes. This time, I could not use the texture technique because I was not using Cycles. Hopefully, after spending a lot of time on it, I find out that it is possible using VRML 2.0 format (.wrl extension). This file format describes a 3D scene with all the usual stuff like cameras, light sources, materials but more importantly 3D objects with their coordinates and it allows color per face. The difficult part was not to find a file format that would allow color per face since other formats can too (PLY for instance) but a format that Blender would correctly parse (not PLY). I was quite happy with this discovery because I was really close to switching back to Cycles. One day, I’ll try to use it with Cycles too but that’s for another article.
Conditional edges
Amongst the polyhedra there is a category that has conditional edges, so, two adjacent faces are in the same plane and their dihedral angle is 180 degrees.
In Freestyle, there are different options to select which lines to render. One is the edge detection based on a threshold on the dihedral angle, called the crease angle, between adjacent faces. Unfortunately, since Blender triangulates non-triangular faces, other edges like the diagonals in the squares or pentagons would render too if using this criteria only. However, it is possible to mark the edges to render either directly through the interface or by using a python script. This is what I implemented in my script and it is done prior to the triangulation so it works well.
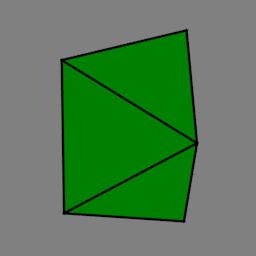
In the black and white style render, I visualized the conditional edges with a gray color. In fact, I rendered all marked edges in gray and then rendered the marked edges that satisfied the crease-angle-lower-than-179-degrees condition in black on top. For the pen-on-paper style rendering, I did not make a distinction between edges. For the color rendering, I did not display the conditional edges at all. The coloring of these faces is the main hint, though. Two flat triangles make a green rhombic face instead of a square blue one, so it is hard to see but between an triangle (green) and a square (blue), the color change indicates the conditional edge. Remember that there are only 5 types of faces with a conditional edge: 3+3, 3+4, 3+5, 3+4+3 and 3+5+3.
If you go back to the glass renders, you can see that diagonal edges are rendered (look at the square or the dodecahedron for instance). I think it is caused either by the wireframe modifier or by Cycles. There may be a way to prevent this undesired effect but I leave it for another post.
Chirality
Chirality means that the object and its mirror reflection cannot be superposed, a daily example are your left and right hands. But one member of the pair can be obtained from the other member by a mirror reflection. The rendering of the other pair is obtained by horizontally flipping the frames with ImageMagick which simulates the mirror reflection. However, the model now rotates in the wrong direction, so I reversed the frame order in the animation to restore the original movement. It is just a hack to avoid the rendering but it also removes the additional storage of the frames.
Gallery
Pictures are 256x256 pixels and animations are 72 frames at 24fps. Rendering time is reasonable on my machine, something like 2-3 hours for one set with all solids.
Since there are so many solids, I have split renders in different pages and organized them by category. Images should be displayed at full size and animations may be viewed by clicking on them.
References
[1] Dashed lines (made with freestyle) are rendering inconsistently. https://blender.stackexchange.com/questions/77647/dashed-_lines-_made-_with-_freestyle-_are-_rendering-_inconsistently. Accessed on 10-02-2019.
[2] Silvain Gagnon. Convex polyhedra with regular faces. Structural Topology, 1982, núm. 6, 1982.
[3] David I. McCooey. Visual polyhedra. http://dmccooey.com/polyhedra/. Accessed on 11-08-2018.